
#SDK Related
#1 Add push SDK and related configuration
#1.1 Add Maven library address
In the top-level build.gradle file named after the project name, add the google service dependency and the maven library address as follows:
buildscript {
    ......

    dependencies {
        classpath 'com.android.tools.build:gradle:3.4.1'
        classpath 'com.google.gms:google-services:4.2.0'
    }
}

allprojects {
    repositories {
        maven{ url 'https://mvn.shalltry.com/repository/maven-public'}
        ......
    }
}
#1.2 Configuration dependencies
Refer to the push SDK dependency library in app / build.gradle file as follows:
apply plugin: 'com.google.gms.google-services'
    defaultConfig {
        ......
        manifestPlaceholders = [
                "tpush_appid" : "xxxxxx",
                "tpush_appkey": "xxxxxx"
        ]
    }
......
dependencies {
   ......
   api("com.transsion.tpush:core:1.7.0.02")
   api 'com.google.firebase:firebase-messaging:23.2.0'
}
apply plugin: 'com.google.gms.google-services'
Note: tpush_appid and tpush_appkey are viewed in the push background app details
#2 Integration code
#2.1 Initialize the SDK
Initialize the SDK in the Application of the application, as shown below
public class MyApplication extends Application {
    @Override
    public void onCreate() {
        super.onCreate();
        PushManager.getInstance().init(getApplicationContext());
        ......
    }
}
#2.2 数据透传及初始化完成监听
数据透传:可在推送平台自定义数据格式,在 App 中以广播回调的形式接收数据。
广播在 Application 中注册,如下:
public class MyApplication extends Application {
    @Override
    public void onCreate() {
        super.onCreate();
        // push初始化
        PushManager.getInstance().init(getApplicationContext());

        //废弃方法
        //PushManager.getInstance().registerReceiver(Context context, BroadcastReceiver broadcastReceiver)

        // 使用新方法进行初始化和透传回调注册
        PushManager.getInstance().registerPushListener(new TPushListener() {
            @Override
            public void onMessageReceive(long msgId, String transData) {

            }

            @Override
            public void onSdkInitSuccess(String clientId, String token) {

            }

            @Override
            public void onNotificationShow(long msgId, String landingPage) {

            }
        });
    }
}
onSdkInitSuccess 为初始化完成回调
onMessageReceive 为透传消息回调
注:透传场景为纯json字符串,若业务后续通过透传发送消息,可以调用以下接口传递推送效果数据至 HiPush 服务端
#PushManager.getInstance().trackShow(messageId);
为通知显示埋点接口,即:当发送的一条推送为透传消息并且是用来显示通知的,在调用NotificationManager的notify方法后,调用这个接口,如下示例:
NotificationManager notificationManager = (NotificationManager) context.getSystemService(Context.NOTIFICATION_SERVICE);
......
notificationManager.notify(id, notification);
PushManager.getInstance().trackShow(messageId);
#PushManager.getInstance().trackClick(messageId);
为通知点击埋点接口,即:当发送的一条推送为透传消息并且是用来显示通知的,在用户点击通知后调用这个接口
#2.3 通知样式
当前推送通知支持:系统默认通知和按钮样式。
默认通知样式支持:标题,内容,及展开文字和展开图片
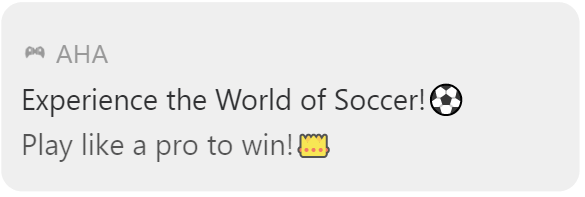
默认样式案例:
默认样式-展开图片案例:

按钮通知样式支持:图标,标题,内容,按钮文字
按钮样式案例:

自定义默认样式参数
PushManager.getInstance().addCustomNotification(new PushNotification.Builder()
        .setType(PushConstants.NOTIFICATION_DEFAULT_TYPE) //必填
        .setChannelId("xxx")  //选填,端侧自定义的channel id
        .setSmallIcon(R.drawable.test_notification_small_icon)  //选填,通知小图标,端侧自定义的通知小图标
        .build());
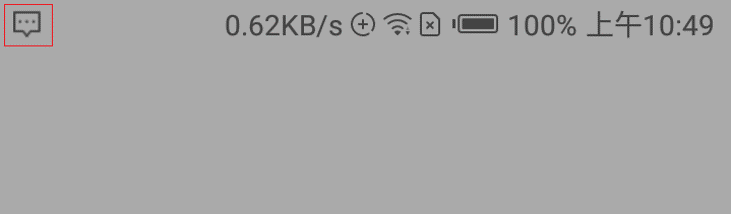
通知小图标
该图标将会作为通知图标展示在通知栏顶部,如下所示
通知图标的建议尺寸如下:
| DPI | 图标尺寸 |
|---|---|
| ldpi | 18*18 |
| mdpi | 24*24 |
| hdpi | 36*36 |
| xhdpi | 48*48 |
| xxhdpi | 72*72 |
| xxxhdpi | 96*96 |
#2.4 clientId 和 Token 获取
当业务需要通过业务自身服务器对用户进行api消息推送时,需要对 HiPush 提供用户的clientId字段,该字段为用户在 HiPush 端的唯一标识,可以通过以下方法获取clientId,然后根据端侧逻辑同步至业务服务器
clientId:HiPush 的用户唯一标识,可以直接用 HiPush api 通过token下发推送给指定用户
token:firebase的用户唯一标识,可以直接用firebase api通过token下发推送给指定用户
//异步方法
PushManager.getInstance().getClientId(new IClientIdListener() {
    @Override
    public void onFail(String msg) {
        Log.d("PUSH_", "getClientId fail:" + msg);
    }

    @Override
    public void onSuccess(String clientId) {
        Log.d("PUSH_", "getClientId success:" + clientId);
    }
});


//同步方法(可能返回null)
String token = PushManager.getInstance().getToken(context);
#2.5 主题订阅
订阅 subscribeToTopic
注:订阅需要初始化完成之后调用
PushManager.getInstance().subscribeToTopic(topic, new ITopicListener() {
    @Override
    public void onFail(String msg) {
        Log.d("PUSH_", "订阅失败:" + msg);
    }

    @Override
    public void onSuccess() {
        Log.d("PUSH_", "订阅成功");
    }
});
取消订阅 unsubscribeFromTopic
  // topic为取消订阅的主题,String类型
PushManager.getInstance().unsubscribeFromTopic(topic, new ITopicListener() {
    @Override
    public void onFail(String msg) {
        Log.d("PUSH_", "取消订阅失败:" + msg);
    }

    @Override
    public void onSuccess() {
        Log.d("PUSH_", "取消订阅成功");
    }
});
#2.6 Set test AppId and AppKey
The current push platform supports the test mode. The test application and the officially released application package name can be the same, but the AppId and AppKey are different. The specific calling method is as follows:
// Determine if it is test mode
if (isTestMode) {
    PushManager.getInstance().setAppInfo(appId, appKey);
}